How to Schedule a Report in Netsuite
How to Schedule a Report in Netsuite
To schedule a report:
1. Go to Reports > Reports Overview and click the name of the report you want to schedule to run the report.
2. In the footer of the report, click the Schedule button .
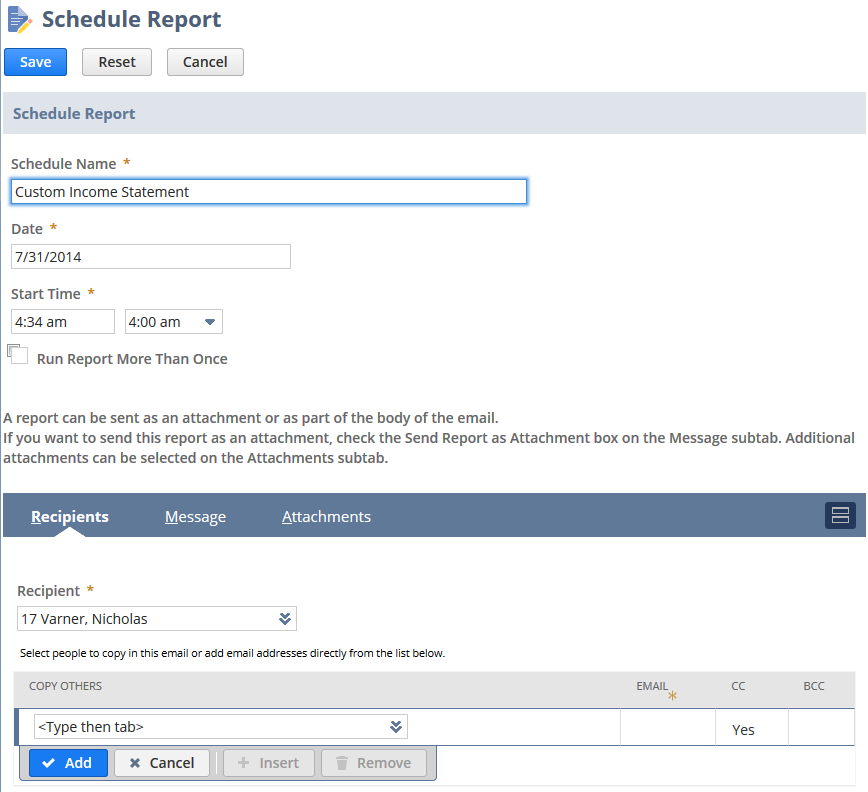
3. On the Schedule Report page, enter a name for the schedule.
This name will help you identify this schedule on the Report Schedules list.
4. Enter the date for the report to run. If the report is to be run more than one time, then this date will be the date that the schedule becomes active.
5. Enter the start time for the report. If the time you select is during peak hours, this will be indicated to the right of the time field. See the preceding note about scheduling reports during off-peak hours.
Note:
The date and time are set according to your timezone, as set in Home > Set Preferences > General, at the time of creating the schedule. Changing your timezone will not affect the timing of existing scheduled reports.
6. Check the Run Report More Than Once box if you would like the report to run multiple times. If you select this box the page will expand to reveal further scheduling options as follows:
1. Daily Event – Specify the frequency: Repeat every X days (also counting weekend days) or Repeat every weekday (Monday-Friday).
2. Weekly Event – Specify the frequency: Repeat every X weeks and choose which days of the week it should run.
3. Monthly Event – Select day X of every X months or specify the (1st, 2nd, … last) (Sunday, Monday, … Saturday) of every X Months.
4. Yearly Event – Select the date or specify the (1st, 2nd, ... last) (Monday, Tuesday, ... Saturday) of (Jan, Feb ... Dec).
5. Start At and End By – Enter the date range you want to schedule the report for.
If you are scheduling a single event, the report will be emailed on the date entered in the Start At field.
If you are scheduling a repeat event, the report will be emailed according to the schedule you set starting on the date entered in the Start At field and ending on the date entered in the End By field.
6. No End Date - Check this box if you want the schedule to repeat indefinitely.
This field is checked by default. Entering a date in the End By field automatically clears this box.
7. On the Recipients subtab:
1. The Recipient field is pre-filled with your email address. You can change the primary recipient by selecting from the Recipient dropdown list.
Note that if email notifications for the report schedule fail, timed-out reports and other notifications are sent to the primary recipient. The recipients in the Cc and Bcc lists do not receive these failure notification emails.
2. In the Copy Others dropdown list, select an additional recipient and choose whether to include in the Cc or Bcc list, and click Add.
3. Repeat step b for each additional recipient to be copied.
Note that a primary and copied to recipient(s) can be either an individual user or a group. Dropdown lists include each group that has a group email address.
8. On the Message subtab:
1. Enter custom subject and body text for email messages.
2. Choose the Sending Format from the list.
9. On the Attachments subtab:
1. In the Attach File field, select a file from your computer or File Cabinet to attach to the email, and click Add.
2. Repeat to attach additional files.
3. Check the Zip attachments box if you want to attach a zip file of all selected attachments.
10. Click Save.